
More kitchen tile backsplash ending questions are coming in and I am ready to help!
When you partially remodel a kitchen or even when you do a full gut job, one of the biggest questions that unexpectedly comes up is where to end the backsplash. Often people remove some upper cabinets or want to add tile where they didn’t have it, etc. and then inevitably, there are material transition issues.
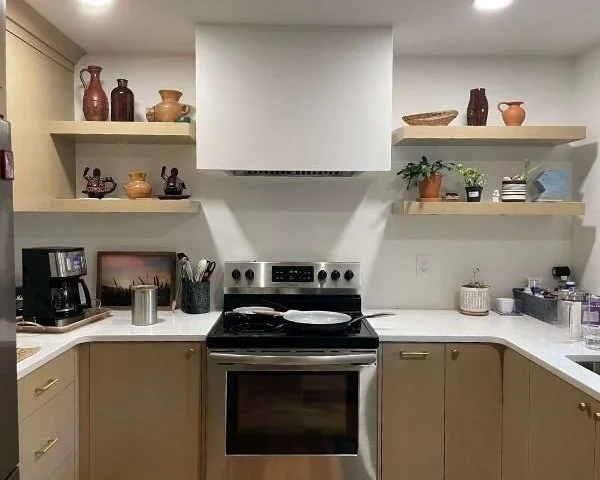
Such was the case with this recent Designed in a Click consultation about a beautifully remodeled kitchen that had been recently completed…. all except for the backsplash.

I love the hood and floating shelves and the cabinetry looks so fresh. Great job on their remodel!
Now, they are looking to add some pretty blush Zellige tile like this and cannot figure out how high it should go and where it should end on the wall.

One of the questions was about the blush Zellige.
I think this tile will look great with the crisp white counters and the warm tone light wood cabinetry. It reminds me of this color palette I’ve written about before.
Two questions were about the location of the backsplash.
Where should it go and how high should it be? She had read some of my blogposts about backsplashes and still didn’t know where to put it, especially on the window wall. She had a peninsula kitchen and those can often be puzzling to figure out how to end the backsplash.
Along the back wall, I like the idea of taking the tile to the ceiling. Because the shelves are floating there at the hood, I just think that would make a nice impact to tile that whole wall above the counter. It will make the hood stand out too. Then, I would tile the window wall up to the same level as the first shelf and run it all the way to the end of the counter.
I would recommend one extra detail though to make this look totally intentional and purposefully designed, a small ledge that imitates the look of the floating shelves to top the backsplash all the way down the wall. I like a little trendiness sometimes and small ledges in kitchens are sooo popular now and frankly, quite useful!
I designed one into this kitchen remodel at a coffee bar, in a recent project.

A small wood ledge like the one in this kitchen’s coffee bar makes a great place to prop up art, tiny vases and interesting collections.
You can see, below, that the shelves die into the cabinet on the left but float away from the wall on the right.
I would propose that they replace the right side shelves and have them die into the wall. The lower shelf can tie in the ledge that would run down the wall and cap the tile backsplash.


Sketch, Kitchen Tile Backsplash - Where to end and how high to run the tile?
Then, to make it look fully complete, I’d turn the ledge down the wall at the end of the peninsula and die it into the countertop. Here’s a sketch showing the look I proposed.

Sketch, Kitchen Tile Backsplash - Where to end and how high to run the tile?
I think this would work well and make sense for the tile. Zellige is a rather thick, undulating, handmade looking tile and edging it properly is important.
The tile will match the tile splash height on the opposite wall and there will be a a substantial amount of tile on the window wall. The backsplash tile won’t be too overwhelming. Sometimes it is nice to not tile every wall to the ceiling and have painted sheetrock somewhere in a kitchen.
I recommended this for another consultation a few years ago.
The last question was about the outlets and switches on the backsplash. I have a post that explains some ideas on how to deal with those here and as you can see in my sketches, I noted that as well.

One last thought, I didn't know if that was a new range or one that she had for awhile.
If she was considering a new one at some point, I suggested she might get one without that high back, a range that is flat all the way across the top. It will just look more like a professional range and let your tile be featured so much more!
If you have a few questions on a project you are working on now or considering in the future, check out this email consultation service I offer. I’ve helped a lot of people working on their own projects over the years!
And if you don’t want to bother me but still need a little extra help, my Backsplash Bible might be just for you.
How to make this kitchen less gold toned, with only a partial remodel? Find out by clicking through….